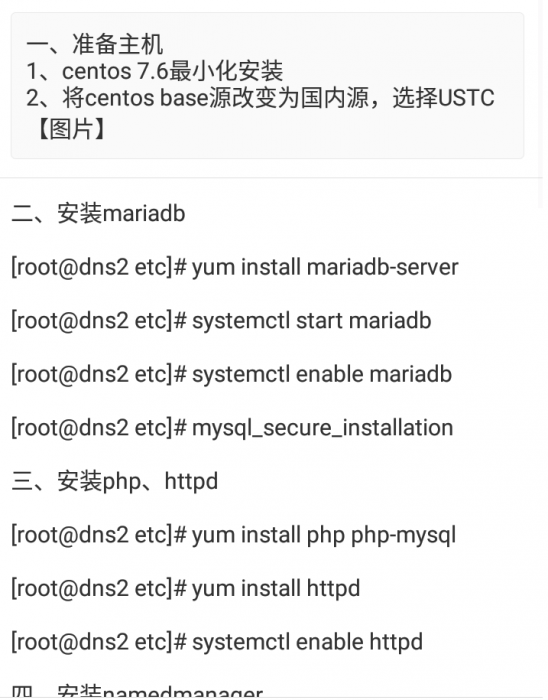
搭建DNS服务器

3、添加epel源,依然选择ustc
[root@Centos7u6 ~]#yum install http://mirrors.ustc.edu.cn/epel/epel-release-latest-7.noarch.rpm
[root@Centos7u6 ~]#yum install -y epel-release
[root@Centos7u6 ~]#sed -e 's!^mirrorlist=!#mirrorlist=!g'
-e 's!^#baseurl=!baseurl=!g'
-e 's!//download.fedoraproject.org/pub!//mirrors.ustc.edu.cn!g'
-e 's!http://mirrors.ustc!!g'
-i /etc/yum.repos.d/epel.repo /etc/yum.repos.d/epel-testing.repo
4、[root@Centos7u6 ~]#yum makecache
5、安全设置
5.1 SELINUX设置
[root@dns2 etc]# setenforce 0
[root@dns2 etc]# sed -i 's/SELINUX=enforcing/SELINUX=disabled/g' /etc/selinux/config
5.2设置防火墙
[root@dns2 etc]# firewall-cmd --add-service=http --permanent
[root@dns2 etc]# firewall-cmd --add-service=https --permanent
[root@dns2 etc]# firewall-cmd --add-service=dns --permanent
[root@dns2 etc]# firewall-cmd --reload
回复列表
-

内容加载中...
看图
回复列表
-
内容加载中...
[root@dns2 etc]# vi /etc/namedmanager/config-bind.php
......
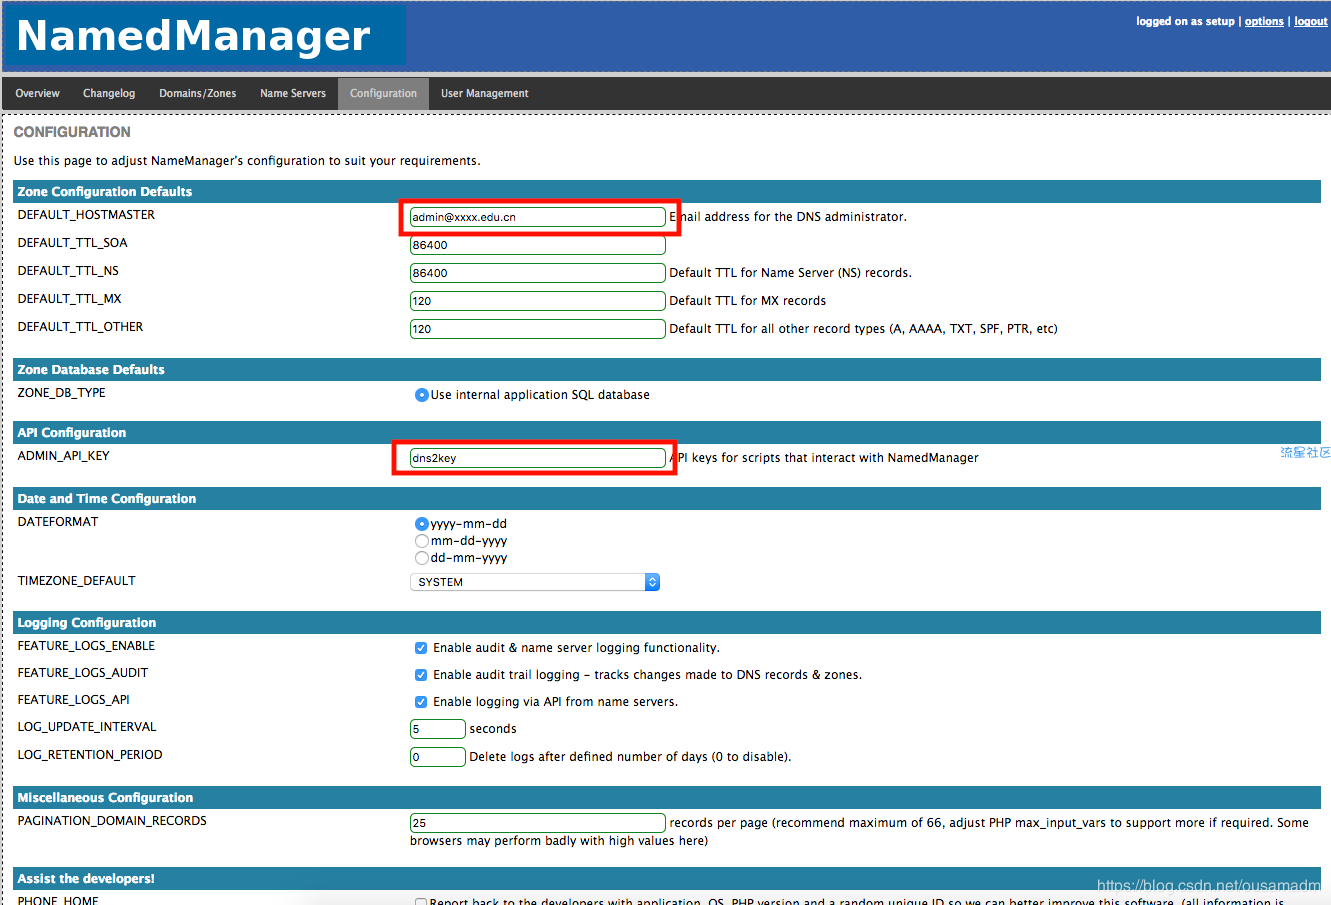
$config["api_url"] = "[hide]http://10.20.100.4/namedmanager[/hide]"; // Modify here Application Install Location
$config["api_host"] = "10.20.100.4"; //ADD this line for namedmanager_logpush
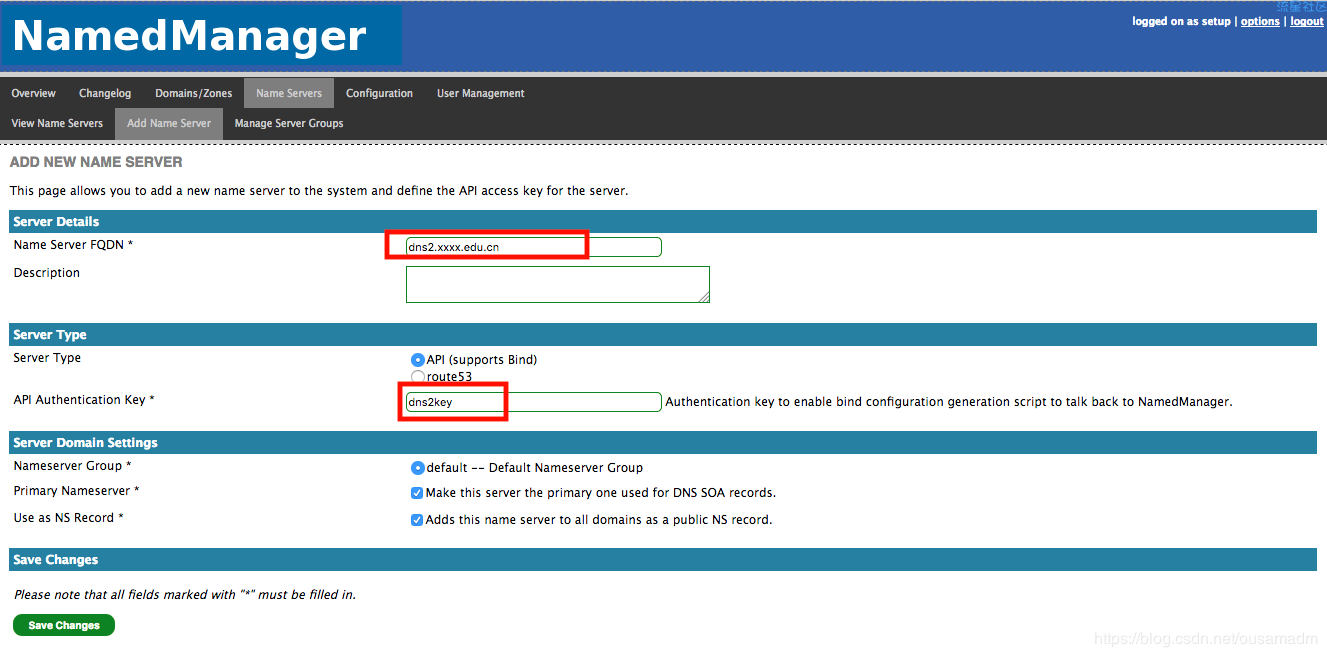
$config["api_server_name"] = "dns2.xxxx.edu.cn"; // Modify here Name of the DNS server (important: part of the authentication process)
$config["api_auth_key"] = "dns2key"; // Modify here API authentication key, this key will be used in the manager portal.
......
$config["bind"]["version"] = "9"; // version of bind (currently only 9 is supported, although others may work)
$config["bind"]["reload"] = "/usr/sbin/rndc reload"; // command to reload bind config & zonefiles
$config["bind"]["config"] = "/etc/named.namedmanager.conf"; // configuration file to write bind config too
$config["bind"]["zonefiledir"] = "/var/named/"; // directory to write zonefiles too
// note: if using chroot bind, will often be /var/named/chroot/var/named/
$config["bind"]["verify_zone"] = "/usr/sbin/named-checkzone"; // Used to verify each generated zonefile as OK
$config["bind"]["verify_config"] = "/usr/sbin/named-checkconf"; // Used to verify generated NamedManager configuration
......
3、配置httpd
[root@dns2 etc]# vi /etc/httpd/conf/httpd.conf
......
AllowOverride none
# Require all denied
......
回复列表
-
内容加载中...
[root@dns2 etc]# cd /usr/share/namedmanager/resources/
[root@dns2 etc]# vi autoinstall.pl
.......
# default settings
# (only need to change these if you are doing development work)
my $db_user = "root"; # name of user to be used to create data
my $db_name = "namedmanager"; # name of the DB to create
my $db_host = "localhost"; # MySQL server
my $db_bs_user = "namedmanager"; # name of the aoconf user to create
my $db_bs_password = "123456";# Modify here random_password(10); # random password to generate
[root@dns2 etc]# ./autoinstall.pl
八、重新启动服务
[root@dns2 etc]# systemctl restart httpd
[root@dns2 etc]# systemctl restart mariadb
[root@dns2 etc]# systemctl restart named-chroot
九、通过web配置DNS
1、登录管理界面
https://你的IP/namedmanager,使用 setup/setup123为username/password
回复列表
-
内容加载中...
回复列表
-
内容加载中...
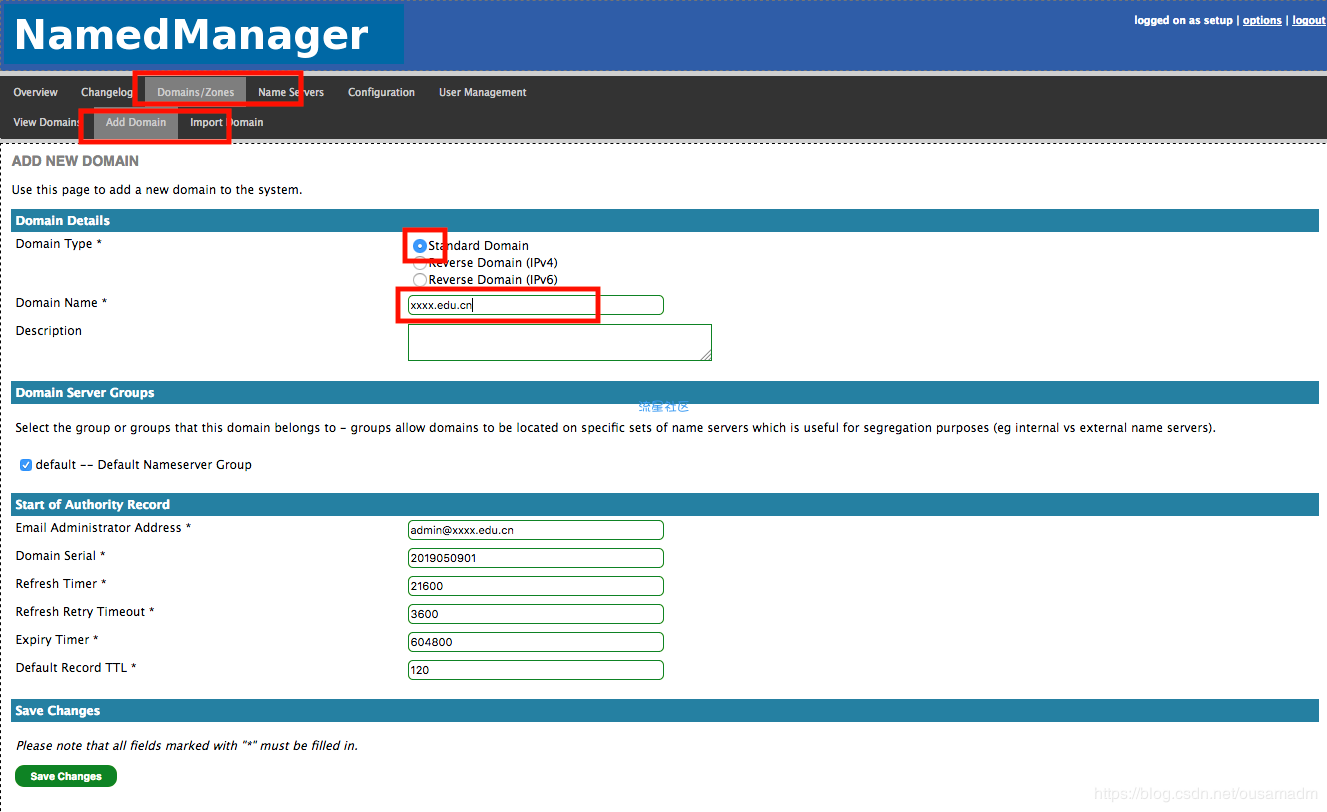
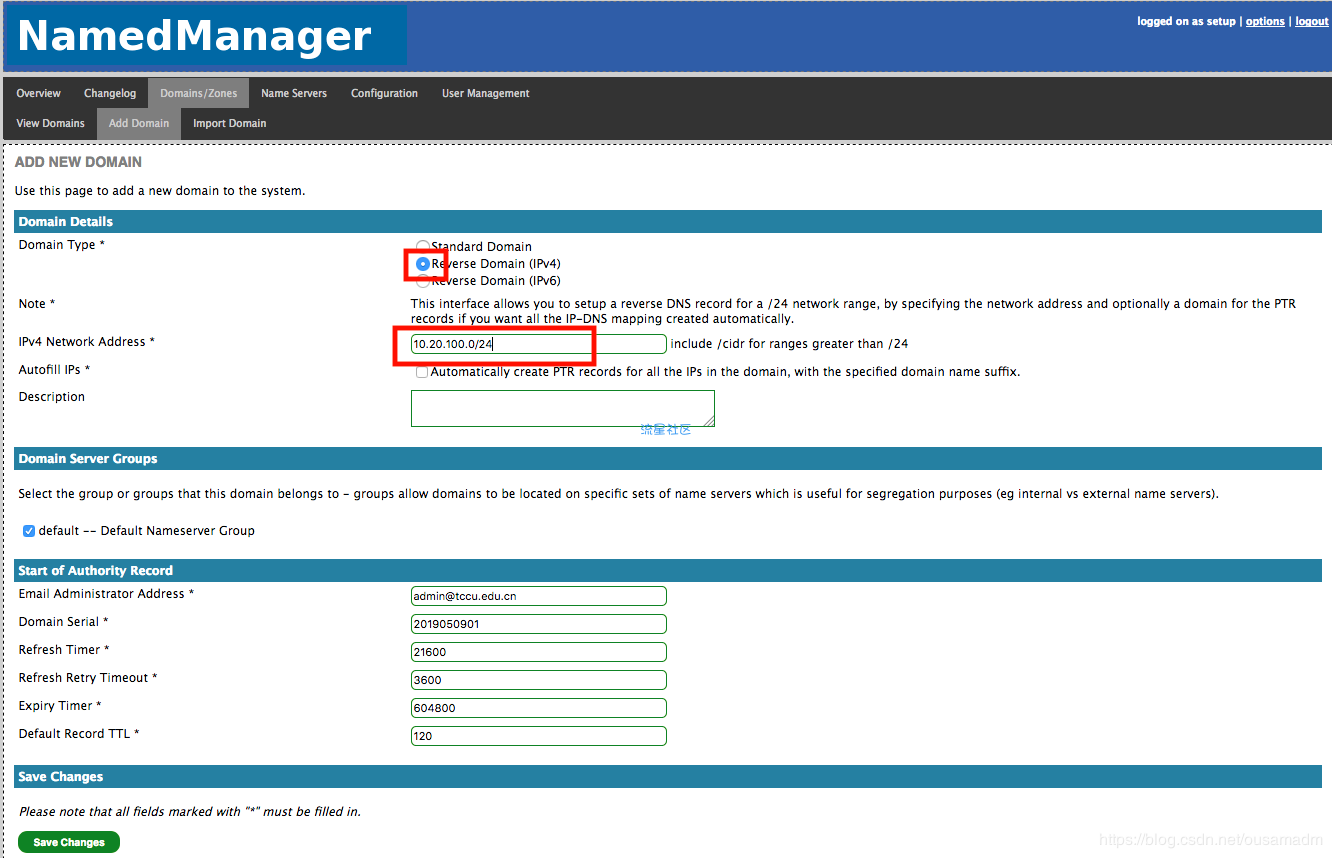
"Domains/zones -> View Domains, -> Add New Domain".
a、正向解析domain
回复列表
-
内容加载中...
回复列表
-
内容加载中...
回复列表
-
内容加载中...
回复列表
-
内容加载中...
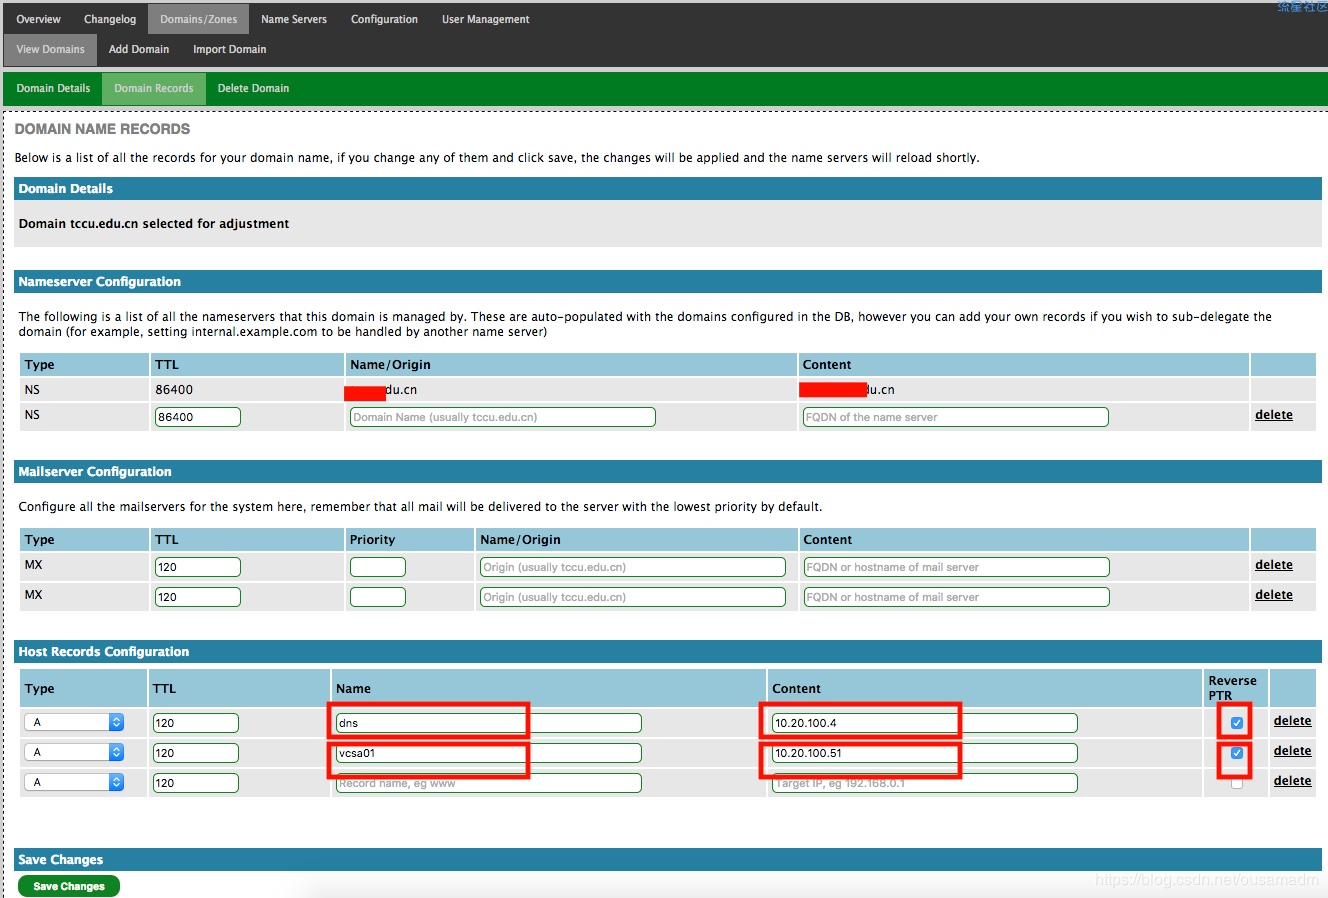
Domains/zones -> View Domains, 选择 "xxxx.edu.cn", 然后选择 "domain records"
回复列表
-
内容加载中...
 返回首页
返回首页
 编程源码
编程源码